
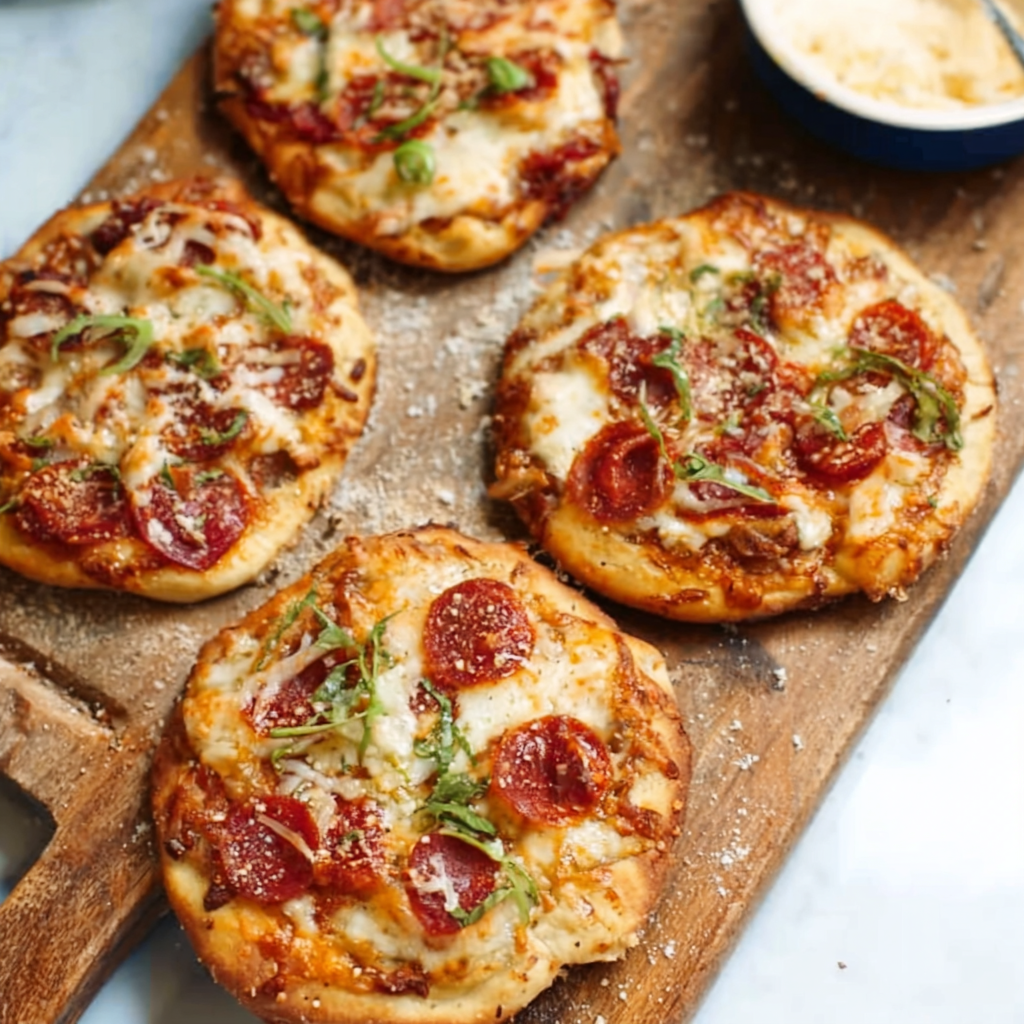
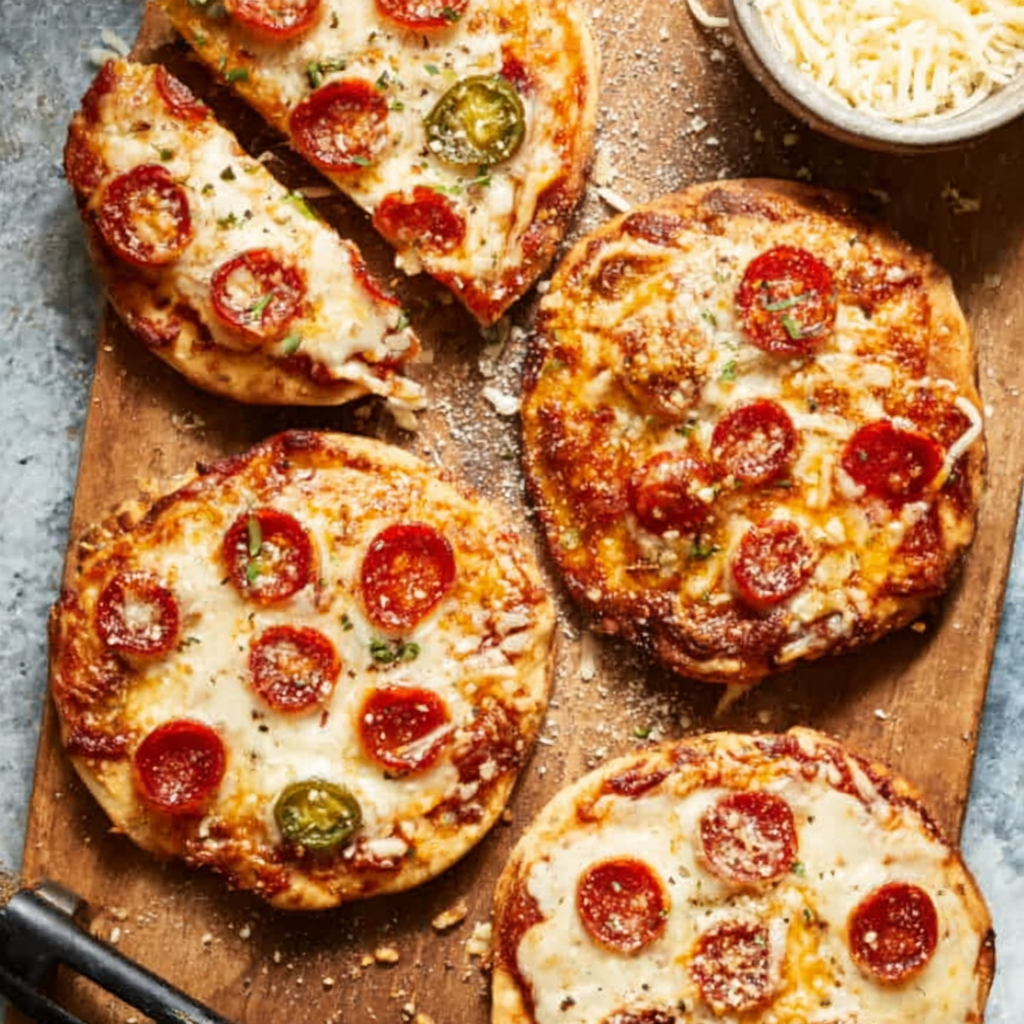
4-Ingredient Mini Pizzas

Quick and customizable mini pizzas made with refrigerated biscuit dough — ready in 20 minutes and perfect for weeknights, parties, and picky eaters.
Why You'll Love This Recipe
- Ready in just 20 minutes from start to finish, perfect for weeknight dinners or last-minute guests.
- Uses pantry and fridge staples: refrigerated biscuits, jarred sauce, mozzarella, and mini pepperoni for minimal shopping.
- Fully customizable so everyone can add their favorite toppings — great for picky eaters and family cooking nights.
- Make-ahead friendly: assemble on a baking sheet, cover, and refrigerate for up to 24 hours before baking.
- Kid-approved and party-ready: easy to scale up and ideal for appetizers, lunchboxes, or a casual main dish.
- Simple technique that produces a golden, slightly crisp edge with a soft, chewy center without yeast or rising time.
Personally, I love how this recipe turned simple ingredients into a joyful ritual. My children enjoy rolling the biscuit rounds and sprinkling their own toppings, and my husband always stacks extra cheese. One night we used leftover roasted vegetables and the whole tray vanished — a small victory for busy parents everywhere.
Ingredients
- Refrigerated biscuit dough: 1 (16.3 ounce) can of biscuits, preferably buttermilk variety for a slightly tangy flavor and soft crumb. Brands like Pillsbury work well; look for the 8-count can for perfect individual crusts.
- Pizza sauce: 1 cup of jarred pizza sauce or marinara. Choose a brand you enjoy (for example Rao's or Classico) because the flavor carries through. If you have time, loosen it slightly with a splash of olive oil for richness.
- Shredded mozzarella: 8 ounces (about 2 cups loosely packed) of freshly shredded low-moisture mozzarella. I recommend shredding from a block because pre-shredded cheese can contain anti-caking agents that affect melting.
- Mini pepperoni: 1/2 cup mini pepperoni slices for classic flavor. Swap for diced vegetables or cooked sausage if you prefer. If avoiding pork, use turkey pepperoni or omit entirely.
- Cornmeal: For dusting the pan so the biscuit crusts lift easily and develop a slight crunch on the bottom.
- Grated Parmesan: For garnish and an extra hit of savory umami once out of the oven.
Instructions
Preheat and prepare: Preheat the oven to 400 degrees Fahrenheit. While the oven warms, lightly flour your work surface and open the can of biscuits. If the biscuits are stacked, separate them gently and let them relax for a minute so they roll out more evenly. Form the crusts: Using a rolling pin or your hands, roll each biscuit into a flat round about 1/4 inch thick and roughly 4 to 5 inches across. Aim for even thickness so they cook uniformly; thinner edges will crisp more quickly while a slightly thicker center stays tender. Prepare the pan: Dust two rimless baking sheets with cornmeal so the crusts don’t stick. Place the biscuit rounds about an inch apart; they will not expand much, so spacing is flexible. Cornmeal gives a pleasant texture and prevents tearing when you remove the mini pizzas. Add sauce and cheese: Spoon 1 to 2 tablespoons of pizza sauce onto each crust and spread gently, leaving a small rim. Divide the shredded mozzarella evenly between the rounds — tip: pile it higher than you think you need for a handsome melted layer. Top and bake: Scatter mini pepperoni or other toppings over the cheese. Bake at 400 degrees for 15 to 18 minutes, until the edges are golden brown and the cheese is melted and bubbly. If you like browned bits on the cheese, switch to broil for 1 to 2 minutes at the end while watching closely to avoid burning. Finish and serve: Remove from the oven, garnish with grated Parmesan, and let rest for a minute before serving so the cheese sets slightly. These are best enjoyed warm and fresh, though they reheat well.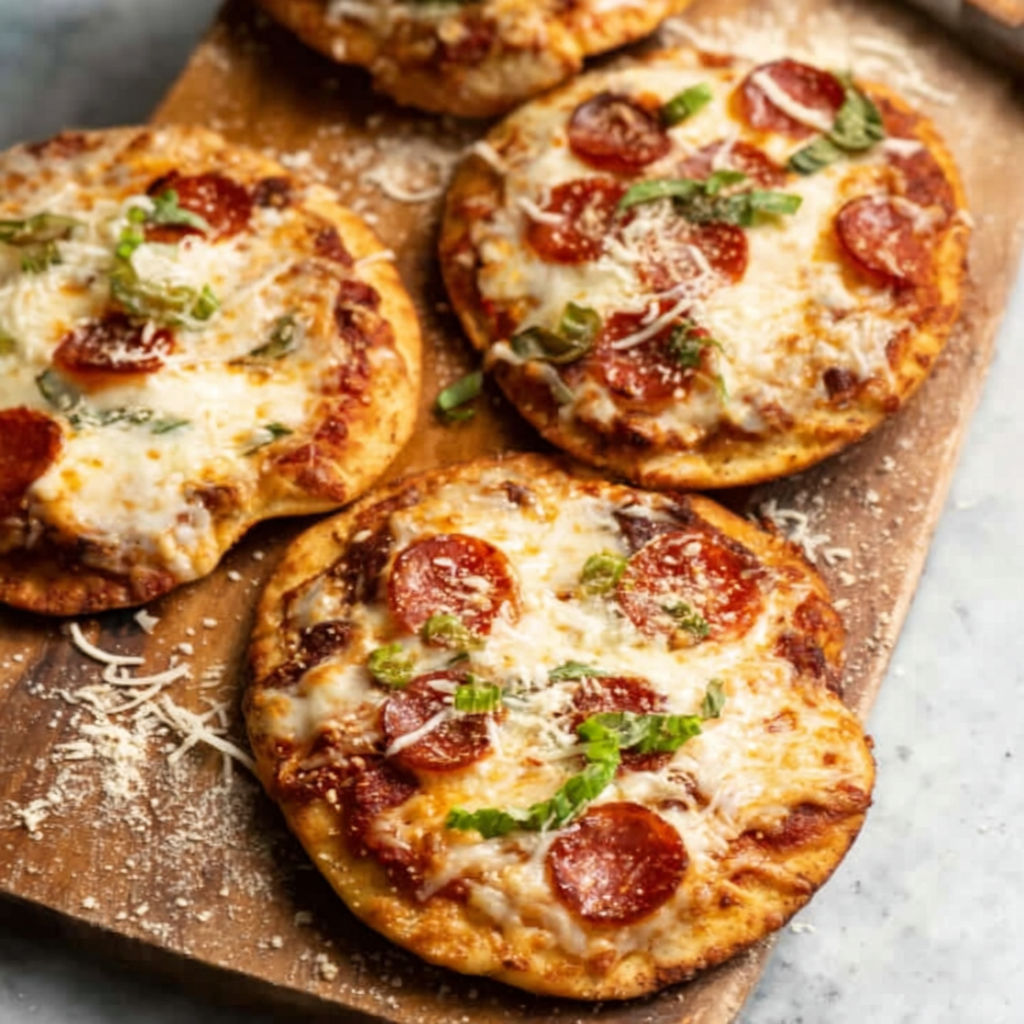
You Must Know
- These individual pizzas freeze well for up to 3 months when wrapped tightly in plastic and stored in a freezer-safe container. Reheat from frozen at 375 degrees Fahrenheit for 12 to 15 minutes.
- High in protein relative to size due to the cheese; each mini pizza provides a satisfying bite and pairs well with a salad to balance the meal.
- Dusting with cornmeal prevents sticking and adds subtle crunch. If you skip this, use parchment paper instead but you will miss the bottom texture.
- Make-ahead option: assemble on baking sheets, cover tightly, and refrigerate for up to 24 hours. Bake directly from chilled — add 2 minutes to the bake time if very cold.
My favorite part of this recipe is how it transformed pizza night in our home. Instead of arguing over toppings, everyone makes their own. One winter evening I made a double batch for a neighborhood potluck and the tray of dessert pizzas — chocolate, marshmallow, and a sprinkle of sea salt — was the first to disappear. Small, fast, and endlessly tweakable, these little pies have become a simple pleasure in our routine.
Storage Tips
To store leftovers, cool completely and place in an airtight container in the refrigerator for up to 3 days. Reheat in a 350 degree Fahrenheit oven on a wire rack over a baking sheet for 8 to 10 minutes to refresh the crust and re-melt the cheese. For freezing, wrap each cooled mini pizza in plastic wrap and then foil, or arrange between sheets of parchment paper in a freezer-safe box. Thaw overnight in the refrigerator before reheating for best texture, or reheat from frozen at 375 degrees for 12 to 15 minutes.
Ingredient Substitutions
If you do not have refrigerated biscuits, use 8 small ready-made pizza dough discs or canned crescent roll dough as a quick alternative. For a gluten-free version, look for gluten-free biscuit dough or ready-made gluten-free crusts; baking time may vary slightly. Swap mozzarella for a dairy-free shredded alternative to make it lactose-free, though melting behavior will differ. Mini pepperoni can be replaced with cooked sausage, sliced mushrooms, roasted red peppers, or fresh basil for a vegetarian option.
Serving Suggestions
Serve these with a crisp green salad dressed in lemon vinaigrette or alongside a bowl of mixed olives for a simple starter. For a party, present an assembly station with assorted toppings — sliced olives, roasted peppers, cooked sausage, fresh basil, and chili flakes — and let guests build their own. Garnish with a drizzle of good olive oil and shaved Parmesan for a restaurant-style finish. These are great with a light soup for lunch or as the centerpiece of a casual dinner buffet.
Cultural Background
While these mini pizzas are a modern shortcut, they draw from classic Italian-American traditions of individual pizzas and handheld pies. Using biscuit dough is an American convenience adaptation that speeds up the process without sacrificing the pleasure of a personal pizza. Variations on small, individual pizzas exist across cultures, from the Sicilian panelle to the flatbreads of the Mediterranean, reflecting the universal joy of customizing a single-serving pie.
Seasonal Adaptations
Spring and summer call for fresh toppings like cherry tomatoes, torn basil, and arugula tossed on after baking. In autumn and winter, swap in roasted squash, caramelized onions, or sautéed mushrooms with a sprinkle of thyme for a heartier option. For holiday parties, try a white sauce base with pear slices and gorgonzola, or make dessert versions with chocolate spread, marshmallows, and sliced strawberries.
Meal Prep Tips
For meal prep, assemble the mini pizzas on baking sheets lined with parchment and flash-freeze for 30 minutes before transferring to storage containers. This prevents them from sticking together and makes portioning simple. Pack reheatable lunches by placing a few cooled mini pizzas in a container with a paper towel to absorb moisture, then reheat in an oven or toaster oven for best texture. Use silicone loaf pan liners or muffin tins to keep toppings contained if you want perfectly uniform minis.
These small pies are a wonderful combination of convenience and comfort. They remind me that some of the best meals come from simple ingredients and a little creativity. Make a double batch, invite friends over, or keep it cozy for family night — and don’t forget the extra Parmesan.
Pro Tips
Grate mozzarella from a block for better melting; freeze the cheese for 10 minutes if it is too soft to grate cleanly.
Dust baking sheets with cornmeal to prevent sticking and to add a slight crunch to the crust bottom.
If you want extra-bubbly cheese, broil for 1 to 2 minutes at the end of baking while watching closely.
Assemble on baking sheets and refrigerate up to 24 hours for make-ahead convenience; add a couple extra minutes to bake time if chilled.
This nourishing 4-ingredient mini pizzas recipe is sure to be a staple in your kitchen. Enjoy every moist, high protein slice — it is perfect for breakfast or as a wholesome snack any time.
Tags
4-Ingredient Mini Pizzas
This 4-Ingredient Mini Pizzas recipe makes perfectly juicy, tender, and flavorful steak every time! Serve with potatoes and a side salad for an unforgettable dinner in under 30 minutes.
Ingredients
Base
Sauce and Cheese
Toppings and Garnish
Instructions
Preheat and prepare
Preheat the oven to 400 degrees Fahrenheit. Lightly flour your work surface and open the can of biscuits so they can relax for a moment before rolling.
Roll each biscuit
Roll each biscuit into a 4 to 5 inch round about 1/4 inch thick using a rolling pin or your hands for an even crust thickness.
Dust sheet and place crusts
Dust two rimless baking sheets with cornmeal and place biscuit rounds about an inch apart to allow handling and topping.
Add sauce and cheese
Spread 1 to 2 tablespoons of pizza sauce on each crust, leaving a small rim, then divide and pile shredded mozzarella over each one.
Top and bake
Scatter mini pepperoni or desired toppings and bake at 400 degrees Fahrenheit for 15 to 18 minutes until edges are golden and cheese is bubbly. Broil 1 to 2 minutes if you want the cheese browned.
Garnish and serve
Remove from oven, sprinkle with grated Parmesan and let rest for a minute before serving to allow the cheese to set slightly.
Last Step: Please leave a rating and comment letting us know how you liked this recipe! This helps our business to thrive and continue providing free, high-quality recipes for you.
Nutrition
Did You Make This?
Leave a comment & rating below or tag
@kitchenfunwithmy3sons on social media!
Categories:
You might also like...
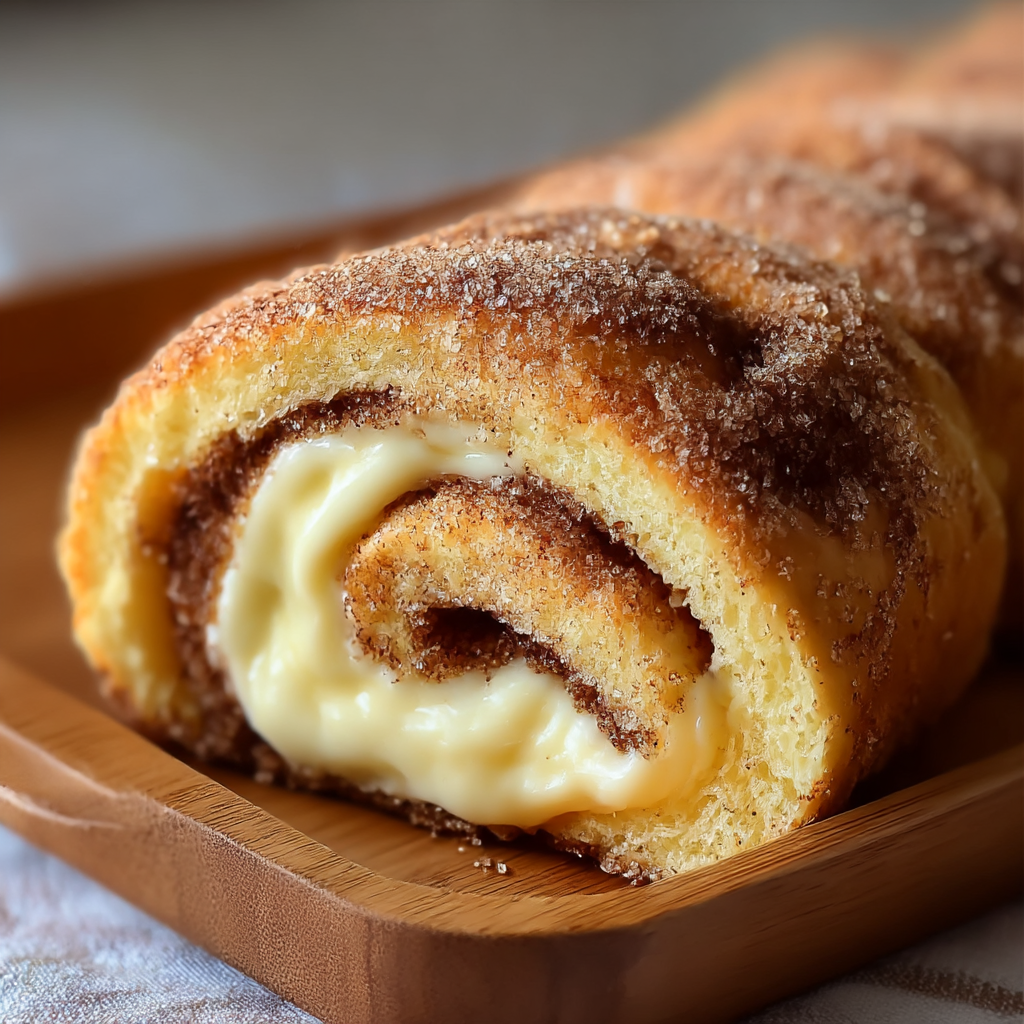
Cinnamon Sugar Cream Cheese Rolls
Buttery pastry envelopes a sweet, creamy cinnamon filling for an irresistible warm dessert or snack—ready in just 30 minutes.

Pineapple Chicken Rice
A bright, one-skillet meal that pairs sweet pineapple with savory chicken and fluffy jasmine rice for an easy, dairy-free weeknight dinner.
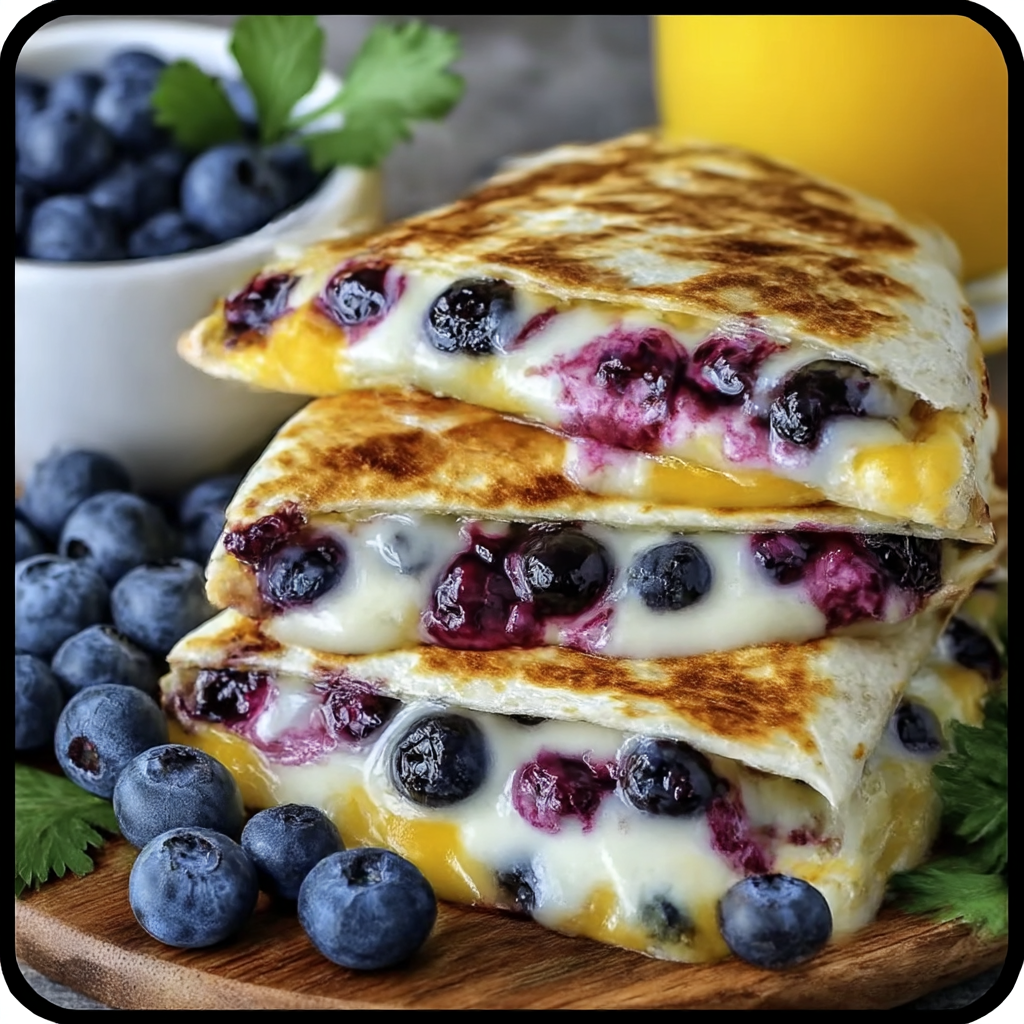
Blueberry Breakfast Quesadilla
Warm tortilla filled with creamy sweetened cream cheese, fresh blueberries and a drizzle of honey—an easy, satisfying morning treat ready in minutes.
Did You Make This?
Leave a comment & rating below or tag @kitchenfunwithmysons on social media!
Rate This Recipe
Share This Recipe
Enjoyed this recipe? Share it with friends and family, and don't forget to leave a review!
Comments (1)
This recipe looks amazing! Can't wait to try it.
Comments are stored locally in your browser. Server comments are displayed alongside your local comments.
Hi, I'm !
What's Popular
Get My 30-Minute Meals email series!
Quick and easy dinner ideas delivered to your inbox.